The end is HERE! Today is the final day of Sale-A-Bration!

Spend $50, before tax and shipping, and choose any Sale-A-Bration product of your choice for free!

If you love Stampin' Up! products you're going to love this!

It almost seems too good to be true, doesn't it?
But it's not!
Members of my stampin' family are just like you! They love to stamp, want a discount on their products and love sharing inspiration.
Check out all the fun HERE.

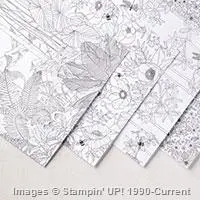
Today's card features the Sale-A-Bration designer paper "Inside the Lines". This stunning, yet simple card, will allow you to create dozens in no time.
I've included the instructions below for those of you using a mobile device. I've also included a downloadable PDF tutorial if you'd like to save it for future inspiration.

All images © 1990-2017 Stampin’ Up!®
Supplies:
- Stamp Sets: So In Love (143112 wood, 143216 clear)
- Paper: Basic Black (121045), Whisper White (100730), Inside The Lines Designer Series Paper (Sale-A-Bration 143830)
- Ink: Tuxedo Black Memento (132708)
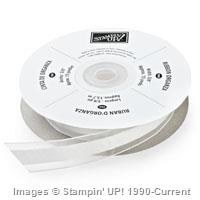
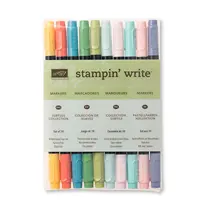
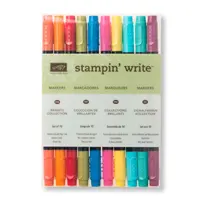
- Other: White Organza Ribbon (114319), Subtles Stampin’ Write Markers (131263), Brights Stampin’ Write Markers (131259), Glue Dots (103683), Dimensionals (104430)
Measurements:
- Whisper White (base): 5 ½” x 8 ½”, folded in half
- Whisper White (layer): 1 ¼” x 1 ¾”
- Basic Black: 3 ½” x 1 ¾”
- Designer Paper (bottom layer): 5 ½” x 4”
- Designer Paper (top layer): 1” x 1 ¼”
- Ribbon: 4”
Instructions:
- Adhere the bottom layer of designer paper to the white card base.
- Color the leaves on the designer paper top layer using the Pear Pizzazz marker. Color the flowers with the Pink Pirouette marker. Accent the flower centers with the Melon Mambo marker.
- Stamp the greeting on the white layer using the black ink.
- Adhere the words and the colored designer paper layer onto the black cardstock. Adhere this layer to the center of the card base using Dimensionals.
- Tie a knot in the ribbon. Adhere it to the top right corner of the colored image/greeting using a Glue Dot.

Studio Stamps in the Mail for April begins on Sunday! You won't want to miss the fabulous products, pre-cut supplies, video and PDF tutorial – all included. Get all the details by clicking on the image below.


I love your card, Lisa. The colored part of the DSP in the frame makes it look as though it is magnified. Very cute! Thanks for the project sheet. Have a great weekend.
Hi HJ! Thanks for stopping by. It’s always great to see you here. So glad you enjoyed the card and tutorial!
JOLIE CARTE