May's edition of Studio Stamps in the Mail begins on Monday, May 1st. You won't want to miss getting your hands on these BRAND NEW products in exclusive bundles. These bundles will not be available in the new catalog so now is the perfect time to order Studio Stamps in the Mail since the new products and supplies to make the cards are included.
This month, too, there are 4 bonus projects.
Watch the introduction video below to see what's included and the cards you will be creating.
Click HERE to get all the details!

I love black with just about any color. The striking color combination always makes for a cheerful and bold card.
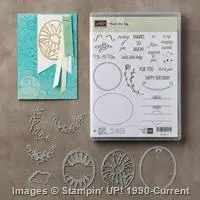
Today's tutorial includes directions on how to use the "That's the Tag" Bundle to create this beautiful stained glass look.
I've included written instructions below for those of you on a mobile device. There is also a PDF download available if you'd like to save the tutorial for future inspiration.
Can you believe this is the last Friday of April?
Have a fabulous weekend everyone!
 All images © 1990-2017 Stampin’ Up!®
Supplies:
- Stamps – That’s The Tag Bundle (144725)
- Cardstock – Daffodil Delight (119683); Basic Black (121045); Whisper White (100730); Soft Sky (131203); Old Olive (100702)
- Ink – Memento Tuxedo Black (132708)
- Other – Pop of Pink Specialty Designer Series Paper (141648); Big Shot (143263), Magnetic Platform (130658); Stampin’ Dimensionals (104430); Fine-Tip Glue Pen (138309)
Measurements:
- Whisper White (base): 5 1/2" x 8 1/2", folded in half
- Whisper White: 2 3/4" x 2 3/4"
- Daffodil Delight (layer): 3” x 3”
- Basic Black (layer): 3 1/8” x 3 1/8”
- Basic Black: 2 1/8” x 2 5/8” to die cut
- Designer Paper (black with white diamond pattern): 1 5/8” x 5 1/2"
- Soft Sky: 2 1/8” x 2 5/8” to die cut
- Old Olive: 2 1/8” x 2 5/8” to die cut
Instructions:
- Die cut the oval daisy thinlit die using the smallest piece of black cardstock noted. Remove all the pieces to leave just the frame.
- Using the same die as in step 1, die cut the center of the Daffodil Delight layer. Remove all the pieces, except the center of the flower.
- Use Fine-Tip Glue to adhere the small white cardstock square to the back of the Daffodil Delight layer. Also glue the black daisy oval to the white. Glue in the flower center.
- Die cut another oval from the daisy thinlit die using Soft Sky cardstock. Remove the pieces, one at a time and using Fine-Tip Glue, adhere them into the black daisy frame as shown.
- Die cut another oval from the daisy Thinlit die using Old Olive cardstock. Remove the pieces, one at a time and using Fine-Tip Glue, adhere them into the black daisy frame as shown.
- Adhere the designer paper to the left side of the card base approximately ½” from the crease.
- Adhere the Daffodil Delight layer onto the black layer. Adhere the layers to the card base using Dimensionals.
- Stamp the sentiment under the right side of the layered image using the black ink.