Isn't this card elegant?
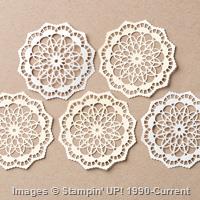
A simple die cut circle of coordinating cardstock behind the intricate Lace Doily creates a beautiful focal point.
I've included the step-by-step instructions below for those of you using a mobile device. I've also included a downloadable PDF tutorial for those that would like to save this project for future use.
Have a great weekend!
 All images © 1990-2017 Stampin’ Up!®
Supplies:
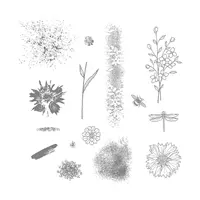
- Stamps: Touches of Texture (143251)
- Inks: Basic Black (140931), Calypso Coral (126983)
- Cardstock: Calypso Coral (122925), Very Vanilla (101650)
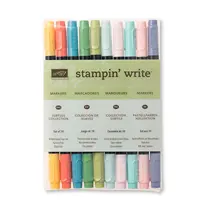
- Other: Lace Doilies (142793), Linen Thread (104199), Subtles Markers (131263), Metallic Enamel Shapes (141678), Big Shot (143263), Magnetic Platform (130658), Layering Circles Framelits (141706), Fine-Tip Glue Pen (138309), Dimensionals (104430)
Measurements:
- Calypso Coral (base): 5 ½” x 8 ½”, folded in half
- Calypso Coral: scrap
- Very Vanilla (layer): 3 ¾” x 5”
- Very Vanilla: scrap
- Linen Thread: 30”
Instructions:
- Stamp the splatter image using Calypso Coral ink on the vanilla layer, twice without reinking the stamp.
- Die cut a 2 ¼” circle using vanilla scrap. Adhere the circle to the back of the doily using the Fine-Tip Glue. Adhere the layered piece to the vanilla layer using Dimensionals.
- Wrap the Linen Thread around near the bottom of the vanilla layer twice. Tie in a knot then make a bow.
- Adhere the vanilla layer to the card base.
- Stamp the flower image using black ink on vanilla scrap. Color in the image using the Blushing Bride marker for the flower petals, the Calypso Coral marker for the flower centers and Wild Wasabi for the leaves. Cut the image out using your scissors. Adhere the flowers to the card base using Dimensionals.
- Add three silver Metallic Shapes to the card as shown.


Don't miss the huge list of retiring products. Accessories are only available while supplies last and loads of items are marked down – up to 50% off! Click on the image below to see the entire list.