Happy Friday – and the end of June!
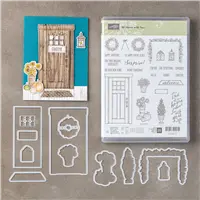
Today's free tutorial uses the At Home With You Bundle. This Bundle includes the 25 piece stamp set and the coordinating framelits, perfect for every occasion and holiday. There's even a greeting to welcome new homeowners! For those of you that dislike fussy cutting you'll be happy to know that the framelits cut out every image in this stamp set.
I've included written instructions below for those of you using a mobile device. I also have a free PDF tutorial available for those that would like to download and save this project for a later day.
Don't forget to check out my Project PDF Tutorial Library for more project tutorials that feature complete card collections and fancy folds. Click HERE to view the library.
 All images © 1990-2017, Stampin’ Up!®
Supplies:
Stamp Set: At Home with You Bundle (145351)
Inks: Tuxedo Black Memento Pad (132708), Berry Burst (144083), Fresh Fig (144082), Lemon Lime Twist (144086), Powder Pink (144084), Tranquil Tide (144085)
Paper: Fresh Fig (144242), Watercolor Paper (122959)
Other: Big Shot (143263), Magnetic Platform (130658), Simply Scored Scoring Tool (122334), Stampin’ Dimensionals (104430), Aqua Painters (103954)
Measurements:
- Fresh Fig (base): 4 ¼” x 11”, scored at 5 ½” and folded in half
- Watercolor Paper (layer): 4” x 5 ¼”
- Watercolor Paper: scraps to die cut
Instructions:
- Adhere the watercolor paper layer to the card base.
- Using black in, stamp the following images on scrap watercolor paper – door, welcome mat, floral wreath, and 2 of the flower planters.
- Die cut the door using the outside frame die. Using the rectangle window frame (with 6 openings), die cut the windows on the door. Use the smaller door framelit to die cut the actual door. Be certain to place the non-cutting edge of this die on the side of the door where it will be hinged.
- Die cut the remaining stamped images using their coordinating framelits.
- Squeeze the closed lid of each ink pad listed below. This will transfer ink to the inside of the lid. Open the lid and using the Aqua Painter, pick up color and color in as noted below. Let the ink dry before proceeding to step 6.
- Welcome Mat: Tranquil Tide
- Planters: Lemon Lime Twist (planter), Berry Burst (flowers) & Tranquil Tide (leaves)
- Wreath: Powder Pink (large flowers), Berry Burst (small flowers) & Tranquil Tide (leaves)
- Door: Fresh Fig
- Once dry, gently “open” the die cut door by carefully folding along the side where it would normally be hinged. Adhere the door and the welcome mat to the card base as shown. Adhere the planters and wreath to the card using Stampin’ Dimensionals.
- Optional – cut a piece of Whisper White cardstock 4” x 5 ¼ and adhere to the inside of the card. You may stamp a sentiment behind the open door, being careful to stamp low enough so that it won’t be seen through the open windows on the die cut door.

As this Bundle caught your eye? Check out the details of this Bundle in the short 3 minute video below.


Lisa, on your page with the Coffee cards and notes, you mentioned about you’re not acquiring a taste of Coffee and being bitter. I so know what you mean. I have never cared for the smell of brewing coffee, but got better in my young (ha ha) age and my husband having his coffee and kids when they are home, that I would deal with. Like you, adding creamer and sugar only made it worse and more yucky. At the young age of 60 in May of that year my hubby came home one afternoon with a Caramel (I love caramel) Frappacino from Starbucks. I tried it, and oh my, that was good. Which made me think, I wonder how Carmel Syrup in Coffee would be, so next time there I tried their Iced Caramel Coffee, and I actually liked it. Since then, for the past 4 yrs, I been drinking coffee only if I have my Caramel syrup to put in it. Like it that way either as Iced (during the hot months of year) and hot during the colder months.
Anyways, thought I’d share with you, and maybe you could like Coffee to drink with your hubby and daughter. Have a great rest of the summer Vonne Gilbert aka Nana Vonne
Hi Vonne! I loved your reply. Thank you for the tip. I’ll have to try that. I love the frappucinnos that have flavoring. Unfortunately I need to watch the sugar intake or I’ll be as big as a house! 😀 Happy summer to you as well. Thanks for stopping by!
Hi Lisa, thanks for your nice note. I know what you mean about the frappucinos, I get on about once a year. Another thing
that I happened to think of that I just have to share with you, since we’ve done this before, with your sharing about Bob the Builder and his time in the Air Force and my sharing about our son, and you about your daughter, well you know how we as parents have to have our “proud parent” moments, well here is mine. Our son has been deployed the for past year, (comes home this Saturday 7-8-2017, (due to his Rank and safety, etc., I can’t mention where he is, but can let you know that they knew they were up for a new assignment when he came home. In March they thought they were going to be going to San Antonio, Texas, but that all changed in April, and they are leaving the end of this month for Washington DC, and he is going to be working in the Pentagon, and the really exciting news, is that after the first of the year, he is being promoted to Lt. Colonel with the US Air Force. Of course, as you already know and can only imagine, we his parents are BEYOND bursting with PRIDE of all his accompolishments, awards, etc., that he has received. Anyways, when it happens, I will have to let you know, and we’ll have to each go to our Starbucks, and have our early Frappucinos to celebrate. Do take care, my Stamping Friend, and THANK YOU for all your wonderful tips, ideas and helpful hints with Stamping even when one is a SMALL Demostrator like me. Happy Stamping
Hi Vonne! You have MUCH to be proud of. Our family members and friends that serve in our armed forces protect our freedom to live as we do. Being an American is a huge deal! His promotion is a clear representation of the man you’ve raised, so kudos to you, too! Let the celebration over Frappucinnos begin!
P.S. There is no such thing as a ‘small demonstrator’. We all hold the sale ‘demonstrator position’, we just use them differently. We’re all part of the same wonderful family of paper crafters with Stampin’ Up! Honored to be a part of it with you!