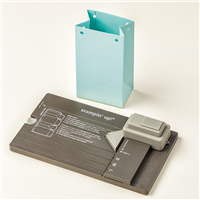
Birthday parties are a timeless tradition. That timeless tradition includes gift gifts and party favors. Today's tutorial covers both those needs. Use the Gift Bag Punch board to create this bag, perfect to give a gift or a favor. Change up the theme and you've got a great favor for showers, too.
I've included written instructions below for those of you using a mobile device. I also have a free PDF tutorial available for those that would like to download and save this project for a later day.
Don't forget to check out my Project PDF Tutorial Library for more project tutorials that feature complete card collections and fancy folds. Click HERE to view the library.
 All images © 1990-2017 Stampin’ Up!®
Supplies:
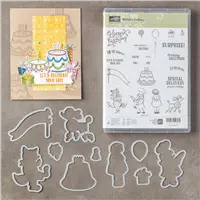
- Stamps –Birthday Delivery Bundle – includes stamp set, designer paper and framelits- (145294)
- Paper – Crumb Cake (120953); Whisper White (100730)
- Ink – Crumb Cake (126975)
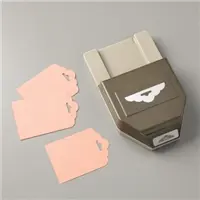
- Other – Stitched Shapes Framelits (145372); Tear & Tape Adhesive (138995); Scallop Tag Topper Punch (133324); Powder Pink 3/8” Shimmer Ribbon (144151); Gift Bag Punch Board (135862); Big Shot (143263)
Measurements:
- Crumb Cake cardstock (bag): 5 ½” x 11”
- Whisper White (tag): scrap
- Designer Paper (red party pattern): 2” x 12”
- Designer Paper (girl with cupcake)
- Ribbon: 12”
Instructions:
- Create a medium gift bag following the instructions on the Gift Bag Punch Board.
- Stamp the sentiment “Special Delivery” using Crumb Cake ink on the bag before assembling it. Adhere the bag together using Tear & Tape.
- Punch the ends of the red party patterned designer paper using the Scallop Tag Topper Punch. Score at 5” and 7” to wrap around the bag. Thread the ribbon through the tag. Finish with a bow.
- Use your scissors to cut out the image on the designer paper that has the little girl holding a cupcake.
- Stamp “Birthday Greetings” on white cardstock scrap using Crumb Cake ink. Die cut using the appropriate size stitched oval framelit, making sure to allocate room to adhere the designer paper image.
- Adhere the girl image to the right side of the greeting on the oval.
- Adhere the tag to the front of the bag using Tear & Tape.

Place a $50 product order and earn a $5 bonus coupon to use in August. There's no limit the number of coupons you can accumulate during the July promotion!

Join the fun during Stampin' Up!'s Christmas in July promotion! Create your own custom kit and receive $72 in free gifts . In addition, enjoy the 20% demonstrator discount through January 31, 2018. There's no obligation! Get the details by clicking on the picture below.