Thank you for all the wonderful birthday greetings and your comments about your favorite stamp set/bundles! Wow! Random.org has selected a winner to receive ANY TWO free Project PDF Tutorials as a prize.

Laura Greig
- Laura, you have until Monday, July 31st to email me to tell me which TWO free PDF Tutorials you would like. Email me by clicking HERE.
- There are over 40 Project PDF Tutorials to choose from. The selections can be found HERE.

When's the last time you sat down and had a little creative therapy? I've got a great tutorial for you today that will allow you to do just that. The sentiment is perfect!
I've included written instructions below for those of you using a mobile device. I also have a free PDF tutorial available for those that would like to download and save this project for a later day.
Don't forget to check out my Project PDF Tutorial Library for more project tutorials that feature complete card collections and fancy folds. Click HERE to view the library.
 All images © 1990-2017 Stampin’ Up!®
Supplies:
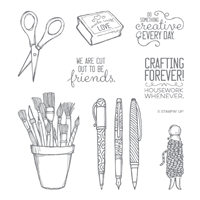
- Stamp Sets: Crafting Forever (clear, 143958) (wood, 143955)
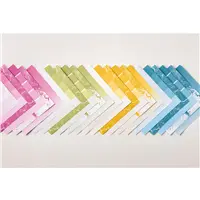
- Paper: Old Olive (100702); Shimmery White Cardstock (101910); Color Theory Designer Series Paper Stack (144193)
- Ink: Basic Black Archival (140931)
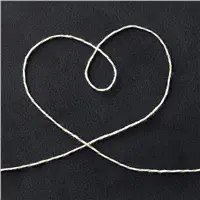
- Other: Watercolor Pencils (141709); Blender Pens (102845); Old Olive Baker’s Twine (134579); Dimensionals (104430)
Measurements:
- Old Olive (base): 5 ½” x 8 ½”, folded in half
- Shimmery White (layer): 2 ½” x 4”
- Shimmery White: scrap
- Designer Paper (ombre pattern): 4” x 5 ¼”
Instructions:
- Adhere the designer paper to the Old Olive base. Adhere the Shimmery White layer to the base as shown.
- Stamp the pot of brushes using Basic Black ink on the Shimmery White layer. Stamp the wood stamp image and the clothespin on Shimmery White scraps using Basic Black ink.
- Add color to all the images using Watercolor Pencils as desired. Use the Blender Pen to blend the color. Be careful not to go over an area too often or the chemical in the blender pen will cause the paper to pill.
- Adhere the Shimmery White layer to the left side of the card base as shown.
- Cut out the wood stamp and clothespin images using your scissors. Adhere the wood stamp image to the lower left corner of the Shimmery White layer using Dimensionals.
- Add adhesive to the back of the clothespin image. Wrap the clothespin with baker’s twine, leaving the raw end visible. Adhere the clothespin in the lower right corner of the Shimmery White layer using Dimensionals.
- Stamp the greeting in the center of the designer paper using Basic Black ink.


You've been waiting and it's BACK! The long awaited Daisy Punch is back in stock and NOW is the time to grab it!
And, I've got a great BONUS for you! Click on the image below for details.


Congratulations Laura Greig. . Lisa thanks for this lovely card as always .
You’re sweet, Gaeyl! So glad you like it!