Most of you know that I live in Florida. Our home is situated in Brandon, a community between Tampa and Orlando. With Hurricane Irma bearing down on Florida, Bob the Builder and I have made necessary preparations for the impending storm. Among those was the purchase of a generator. God willing, the generator should be arriving some time today. The generator will be used to power our refrigerator, freezer and a few mobile devices. For some reason, our neighborhood loses power regularly during typical summer storms so we are expecting that we will be without it again. I’ve worked ahead and scheduled videos and blog posts for you. If you leave comments or send emails please be patient while we ride out the storm.

As a Stampin’ Up! family, we invite you to help us give to those who are now (or will soon be) trying to rebuild their lives. From now until the end of October, Stampin’ Up! will match donations made to the American Red Cross, dollar-for-dollar, for up to $50,000. Please click here to donate.
Fall is my second favorite time of year, right after Christmas. I love the colors of fall, and the cooler temperatures. Fall also ushers in my favorite flavor – pumpkin! I have a love of all things pumpkin. I long for this time of year so I can enjoy pumpkin cheesecake, pumpkin pie – pumpkin anything!
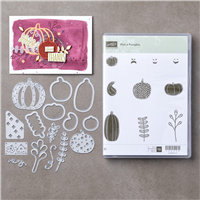
Today’s tutorial features the beautiful pumpkin from the Patterned Pumpkins Thinlits Dies. The dies coordinate with the Pick a Pumpkin stamp set and they are also offered as a bundle.

I created the border along side the card using the fern image from the stamp set using Crumb Cake ink on the Crumb Cake strip allowed for a very subtle tone.

I loaded the pumpkin with die cut ferns and spring using a combination of Glue Dots and Mini Dimensionals.
 The Burlap Ribbon strands are one of my favorite things to add to fall projects. The texture and the color are perfect with the copper pumpkin and the metallic washi tape.

I’ve included written instructions below for those of you using a mobile device. I also have a free PDF tutorial available for those that would like to download and save this project for a later day.
Don’t forget to check out my Project PDF Tutorial Library for more project tutorials that feature complete card collections and fancy folds. Click HERE to view the library. Two new projects were added on August 28th!
Supplies:
- Stamp Sets – Pick A Pumpkin Bundle (wood 146024, clear 146025); Teeny Tiny Wishes (wood 128748. clear 127802)
- Card Stock – Crumb Cake (120953), Whisper White (100730)
- Stamp Pads – Crumb Cake (126975), VersaMark (102283)
- Misc. – Big Shot (143263), Copper Foil Sheets (142020); Year of Cheer Specialty Washi Tape (144644), Embossing Buddy (103083); Copper Stampin’ Emboss Powder (141636); Heat Tool (129053); 5/8” Burlap Ribbon (141487); Mini Glue Dots (103683); Mini Dimensionals (144108)
Measurements:
- Whisper White (base): 5 ½” x 8 ½”, folded in half
- Whisper White (banner): 1 3/8” x 2 ¼”
- Crumb Cake (strip): 1” x 5 ½”
- Crumb Cake: 4” x 5”
- Copper Foil: 3” x 3”
- Burlap Ribbon: 16”
Instructions:
- Layer three different sizes and patterns of the Year of Cheer Specialty Washi Tape approximately 2” from the bottom of the card as shown.
- Stamp the fern image using Crumb Cake ink on the Crumb Cake cardstock strip, lining up one image above the next as shown. Adhere the cardstock to the far right side of the Whisper White cardstock base.
- Pat the Embossing Buddy on the Whisper White banner cardstock. Stamp “Happy Thanksgiving” from the Teeny Tiny Wishes stamp set using Versamark ink. Sprinkle the greeting with the Copper Stampin’ Emboss Powder and heat set using the Heat Tool. Cut a banner tip on the left side of the cardstock. Adhere below the last layer of Washi Tape as shown.
- Die cut the filigree pumpkin from the Copper Foil using the Thinlits that are part of this bundle.
- Stamp various ferns and springs using Crumb Cake ink on the Crumb Cake 4” x 5” piece of cardstock. Die cut the images using the coordinating Thinlits.
- Adhere the ferns and springs in an overlapping cluster to the right edge of the Washi Tape using a combination of Glue Dots and Mini Dimensionals.
- Intertwine the copper pumpkin between some of the ferns and springs. Tuck a few Glue Dots in areas behind the pumpkin that will not be visible from the front to secure it in place. You only need a few.
- Pull out three strands from the Burlap Ribbon. Holding two strands together, wrap them around three fingers. Gently slide them off, pinching in the center. Wrap the third strand around the center of the loops several times then tie in a knot to secure. Adhere to the base of the pumpkin using a Glue Dot.


Hi
I live in Venice. Florida! Just down the road! The storm is a monster of a storm, , please stay safe.!
I sure do wish we weren’t getting “company” on Sunday!
Sharon
Hi Sharon! Thanks for leaving me a comment. I’m praying for you as well.
Hi Lisa,
My prayers are with everyone in Florida.. my brother lives in Naples… and he tells me he too is prepared… I am in New York.. now sure yet if it is headed our way…
Thank you for your prayers, Bernice. We’re praying for the entire state. We can hope that this storm takes a hard right turn to the Atlantic. Thanks for stopping by today.
Lisa, I feel your pain. I live in Tampa and have done as much prep as I can. Sadly, I don’t have a Bob the Builder to help with things like boarding windows and understanding generators, so I will have to ride it out in primitive style. Hoping for the best and wishing you to stay safe as well.
I just found you, Lisa. Love your beautiful work. I live in Ocala, FL. Praying for all in Florida. Stay safe!
Lorna, I’m so glad you found me! Be sure to subscribe to my blog so you don’t miss the updates. From one Floridian to another, stay safe, friend. Prayers will get us through this.
Oh, Donna, I feel for you as well. We can only pray and rest in God’s plan.
Hi Lisa, I’m thinking and praying for you and your family; stay safe! Love your card; it’s so original. TFS!
Hi Zeny! I appreciate the prayers – and thank you for the sweet words about my card. xoxox
Lisa, prayers for you and all in the path of Irma.
Thank you, Kathy! I appreciate your prayers and we certainly feel them.
Lisa
My thoughts and prayers are with you and everyone in Irma’s path.
Thank you for your thoughts and prayers. We feel them.
Hi Lisa….Listening to Fox News and keeping up to date on your weather. Here in PA we just watch and pray for those in danger. I keep up to date with you daily. I use lots of tutorials for inspiration with my cards. Just been into this for not quite two years. Love it and take your tips seriously. Keep safe and see you after the storm.
Susan at 7:20 a.m. Saturday 9/9/17
Hi Susan! Thank you for your thoughtful comment. Thanks for following my blog. Bob the Builder just returned from Lowes where he was only able to get fence sections and 2×4’s for boarding up our windows. This storm’s path is further north and now we are in its direct path. We have been so busy preparing and pray for God’s protection.
Lisa be safe….now I wish I had purchased a generator last year when Matthew came thru. I was able to get plywood on Thursday, and my neighbor Pete helped me out by cutting and guiding me to put up my “wooden Storm shutters” I will be looking into the clear acrylic ones that fit together. Be safe ….I’m NE of Orlando, in Casselberry, but have friends where you are.
Let us know you are okay!!
Toni…..1:50 EST Saturday, just waiting……
I wish you safety as well, Toni. Once the storm has passed I will check in to let everyone know.
Prayers sent your way! Stay safe
Thank you, Debbie. We feel those prayers.
Thank you, Debbie! We have certainly felt those prayers.