Giving stocking stuffers, gift cards and small treats is a lot more fun when you can create something handmade to put them in. Today’s tutorial will provide the perfect packaging for those small gifts.
I’ve included written instructions below for those of you using a mobile device. I also have a free PDF tutorial available for those that would like to download and save this project for a later day. All the supplies can be purchased in my online store. I provide generous ordering REWARDS, too! Details on my REWARDS program can be found HERE.
Don’t forget to check out my Project PDF Tutorial Library for more project tutorials that feature complete card collections and fancy folds. Click HERE to view the library.


Supplies:
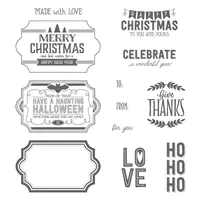
- Stamps– Labels to Love (wood, 144970 clear, 144967)
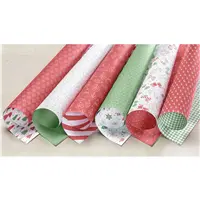
- Paper – Real Red (102482); Be Merry Designer Series Paper (144111)
- Ink – Versamark (102283)
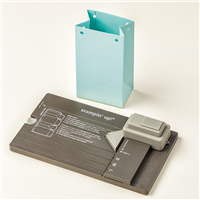
- Other – Gift Bag Punch Board (135862); White Stampin’ Emboss Powder (109132); Embossing Buddy ((103083); Heat Tool (129053); Tear & Tape Adhesive (138995); Everyday Label Punch (144668); Dimensionals (104430)
Measurements:
- Real Red: 2” x 4”
- Designer Paper – gift bag (tree pattern): 6” x 12”
- Designer Paper – bellyband (green speckled pattern): 1 ¼” x 12”
Instructions:
- Using the tree pattern designer paper, create a large bag on the Gift Bag Punch board (following the instructions printed on the board). Turn the bag to the opposite side and punch at the same score lines and score along the horizontal line. TIP: Be sure the designer paper pattern is facing the correct way.
- Cut off all the tabs along one side except ONE of the largest flaps (as shown). If desired, keep the largest tab you cut off to adhere to the front of the top tab as a coordinating pattern.
- Assemble the bag using Tear & Tape Adhesive.
- Rub the Real Red cardstock using the Embossing Buddy. Stamp the greeting using VersaMark ink. Sprinkle with White Embossing Powder and heat set. Punch out the greeting using the Everyday Label Punch.
- Wrap the 1 ¼” x 12” strip of designer paper around folded bag. Adhere the raw edges together in the front. Adhere the label using Dimensionals so that it will cover the raw edges of this strip. TIP: Be certain not to make the bellyband too tight or you won’t be able to slide it off when you’re ready to fill the bag.

Color Like a Pro!

Create images that look professionally colored with the new Stampin’ Blends. These alcohol-based markers are making their debut on November 1st! The Blends are double sided allowing you to choose the brush or fine-point tip. Each color (except Ivory and Bronze) has a light and dark shade and are available individually or as a combo pack. The separate Color Lifter will allow you to reduce ink coverage to create even deeper shading.
Not sure how alcohol markers work? I’ve got ya’ covered. Be sure you’re subscribed to my blog so you don’t miss any of my upcoming posts and videos!
Click on the image below to view the entire Stampin’ Blends brochure!