I’m honored to have been asked to join the Santa’s Little Elves Design Team! This group of busy little elves have been working hard to bring you some AMAZING projects every Friday from now until Christmas! From now through December 15th, every Friday I will be posting a project and tutorial for you to enjoy. Step-by-step instructions, color photos and a complete list of supplies will be included. This design team is all about bringing you fabulous gift ideas that you can create for family, friends, co-workers, neighbors and teachers without having to brainstorm the creation all on your own.
I’ve included written instructions below for those of you using a mobile device. I also have a free PDF tutorial available for those that would like to download and save this project for a later day.
Don’t forget to check out my Project PDF Tutorial Library for more project tutorials that feature complete card collections and fancy folds. Click HERE to view the library. All the supplies can be purchased in my online store. I provide generous ordering REWARDS, too! Details on my REWARDS program can be found HERE.

Acetate Card Box & Cards

Stampin’ Up! Supplies:
- STAMPS – Snowflake Sentiments (144817 wood, 144820 clear), Colorful Seasons (143726 photopolymer)
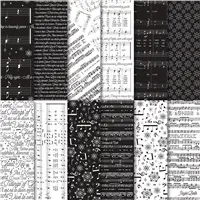
- PAPER – Very Vanilla (101650), Merry Music Specialty Designer Paper (DPS) (144623)
- INK – Crumb Cake (126975), Powder Pink (144084), Basic Gray Archival (140932)
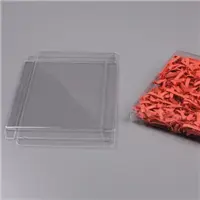
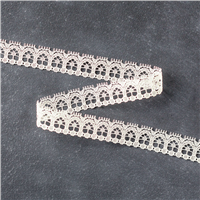
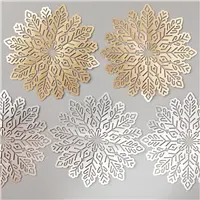
- OTHER – Acetate Card Box (144628), Medium Very Vanilla Envelopes (107300), Powder Pink 3/8” Shimmer Ribbon (144151), Very Vanilla ½” Lace Trim (141672), Clear Faceted Gems (144142), Stamping Sponges (141337), Foil Snowflakes (144642), Big Shot (143263), Layering Ovals Framelits (141706), Tear & Tape Adhesive (138995), Stampin’ Dimensionals (104430), Mini Glue Dots (103683)
Card Cutting & Scoring:
- Crumb Cake – 8 ½” x 5 ½”, score and fold at 4 ¼”
- Powder Pink – 4” x 5 ¼”
- Very Vanilla – 2 ½” x 3 ½”
- Merry Patterns DSP – 2” x 5 ¼”
- Powder Pink Shimmer Ribbon – 14 ½”
- Very Vanilla Lace Trim – 6 ½”
Card Instructions:
- You will be creating 4 cards for this project. It is best to work in an assembly-line fashion.
- Using a wedge of the Stamping Sponge, add Crumb Cake ink to the front and sides of the designer paper. Add just enough color to make the paper appear aged. Using a different wedge of sponge, add Powder Pink ink to the sides of the designer paper.
- Choose two different snowflakes from the Colorful Seasons stamp set. Ink one of the images in Basic Gray Archival ink. Stamp off on scratch paper then stamp on the Powder Pink 4” x 5 ¼” layer. Repeat this process creating a random pattern. You will only need to stamp the left side of the cardstock as the designer paper will later cover the right side. Ink the other snowflake in Powder Pink ink. Stamp off on scratch paper then stamp on the Powder Pink 4” x 5 ¼” layer. Repeat this step, filling in-between the first snowflakes.
- Adhere the designer paper to the right side of the card base.
- Cut one silver Foil Snowflake in half. Add a small amount of adhesive to the center and adhere it along the center, left edge of the designer paper.
- Adhere the Very Vanilla Lace Trim along the left edge of the designer paper using Mini Glue Dots.
- Stamp the greeting using Basic Gray Archival ink on the Very Vanilla 2 ½” x 3 ½” piece of cardstock. Ink one of the snowflakes using Powder Pink ink. Stamp off on scratch paper then stamp over the upper left side of the greeting. Repeat this step, adding another snowflake in the lower right corner of the greeting. Die cut the greeting using the appropriate size Layering Ovals Framelit in the Big Shot. Sponge the edges of the oval using both the Powder Pink and the Crumb Cake sponges.
- Zig zag the ribbon across the center of the card. Use Dimensionals to adhere the greeting over the ribbon. Place the Dimensionals across the center and to the top and bottom of the oval.
- Add a Clear Faceted Gem to the left side of the word “Merry” on the oval.
- Stamp one of each snowflake in the lower left corner of 4 Very Vanilla Medium Envelopes using Powder Pink and Basic Gray Archival inks.
Acetate Card Box Cutting & Scoring:
- Powder Pink – 2 1/2” x 11”
- Powder Pink – 2 ½” x 3 ½”
- Very Vanilla – 2 ½” x 3 ½”
- Merry Patterns DSP – 2” x 11”
- Powder Pink Shimmer Ribbon – 14 ½”
Acetate Box Instructions:
- Construct the Acetate Card Box by creasing on the score lines and tucking in the flaps.
- Using a wedge of the Stamping Sponge, add Crumb Cake ink to the front and sides of the designer paper. Add just enough color to make the paper appear aged. Using a different wedge of sponge, add Powder Pink ink to the sides of the designer paper.
- Adhere the designer paper to the Powder Pink cardstock strip to create a bellyband. Wrap the bellyband around the box, creasing along the edges of the box. Adhere the raw ends to the backside using Tear & Tape Adhesive.
- Adhere a silver Foil Snowflake to the center of the bellyband by placing adhesive in the center.
- Stamp the greeting using Basic Gray Archival ink on the Very Vanilla 2 ½” x 3 ½” piece of cardstock. Ink one of the snowflakes using Powder Pink ink. Stamp off on scratch paper then stamp over the upper left side of the greeting. Repeat this step, adding another snowflake in the lower right corner of the greeting. Die cut the greeting using the appropriate size Layering Ovals Framelit in the Big Shot. Sponge the edges of the oval using both the Powder Pink and the Crumb Cake sponges.
- Die cut a scallop oval using the Layering Ovals Framelits and the Big Shot. Use the Powder Pink 2 ½” x 3 ½” cardstock. Select a scallop oval size slightly larger than the Very Vanilla oval. Adhere the Very Vanilla oval to the Powder Pink oval.
- Zig zag the ribbon across the center of the Foil Snowflake. Use Dimensionals to adhere the greeting over the ribbon. Place the Dimensionals across the center and to the top and bottom of the oval.
- Add a Clear Faceted Gem to the left side of the word “Merry” on the oval.
- Place completed cards and envelopes into the Acetate Card Box.
View of the individual card

View of the Acetate Card Box


Bring Your Coloring to Life!

Create images that look professionally colored with the new Stampin’ Blends. These alcohol-based markers are double-sided allowing you to choose the brush or fine-point tip. Each color has a light and dark shade and are available individually or as a combo pack. The separate Color Lifter will allow you to reduce ink coverage to create even deeper shading. There are also Ivory and Bronze markers which are perfect for skin tones!
Not sure how to use alcohol markers? No worries. I’ve got video tutorials covering the basics to shading. Click HERE to search my videos.
View the Stampin’ Blends brochure to see the color selections, pricing and accompanying products.

You can download a free color chart by clicking on the image below. Be sure to print the chart on Thick Whisper White cardstock for best results.


Lisa I love these nontraditional yet oh so soft and beautiful colors used on this project. Thanks so much for always sharing your great ideas. Looking forward to all the amazing things you’re going to create in the Fridays to come.
Hi Becca! Thank you! I’m excited to share the projects each of the elves has designed during these seven weeks. Thanks for coming by!
I have checked your website and i have found some duplicate content, that’s
why you don’t rank high in google, but there is a tool that can help you to create
100% unique articles, search for: Boorfe’s tips unlimited content
I can not find your layer cutting chart – do you call it something else? I love your video’s, but am frustrated that I an’t find the chart.
Elaine thank you so much for visiting this video. Here is a link for the cutting measurements, pictures and instructions. I hope this is what you need!
https://drive.google.com/file/d/0BxDVUkVfcdhhc1VCcFIzb1NCbWc/view