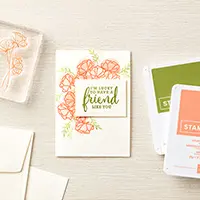
May is flying by and that means half of the Share What You Love new catalog pre-release promotion is over as well. These Bundles are exclusive to the early release and will no longer be available after May 31st. My free tutorial includes a card I created using the Love What You Do stamp set which is part of this promotion. Isn’t this designer paper stunning? Don’t miss the pearlized doilies and beautiful velvet ribbon, both part of this exclusive bundle offerings. Click on the image below to view the products.

Also part of this promotion are the NEW 2018-2020 In Color ink pads at a 10% savings! These gorgeous new colors include the new stamp cases which you’ll love!

I’ve included written instructions for today’s project below. I also have a free PDF tutorial available for those that would like to download and save this project for a later day.
 All images 1990-2018© Stampin’ Up!®
Stampin’ Up! Supplies:
- STAMPS – Love What You Do Photopolymer (148042)
- PAPER – Crumb Cake (120953), Rich Razzleberry (115316), Whisper White (100730), Share What You Love Specialty Designer Series Paper (146926)
- INK – Tuxedo Black Memento (132708)
- OTHER – Basic Black Stampin’ Write Marker (100082), Clear Wink of Stella (141897), Pearlized Doilies (146936), Rich Razzleberry ¼” Velvet Ribbon (147016), 2 ¼” Circle Punch (143720), Stampin’ Dimensionals (104430), Mini Glue Dots (103683)
Cutting & Scoring:
- Crumb Cake (base) – 4 ¼” x 11”, score at 5 ½” and folded
- Rich Razzleberry – 4 1/8” x 5 3/8”
- Rich Razzleberry – 5/8” x 1 ½”
- Designer Series Paper – 4” x 5 ¼”
- Whisper White – 2 ¾” x 2 ¾”
Instructions:
- Adhere the designer paper to the Rich Razzleberry layer. Adhere these layers to the card base.
- Cut 13” of Rich Razzleberry Velvet Ribbon. Zig Zag the ribbon diagonally across the center of the designer paper as shown. Adhere in place using Glue Dots.
- Stamp the floral image using Memento ink on the Whisper White cardstock. Stamp the solid shadow image using Rich Razzleberry ink, stamping off one layer on scratch cardstock to reduce the color. Stamp the image over the outline images, repeating to cover all three flowers. Punch out the image using the 2 ¼” Circle Punch. Adhere it to the center of the Pearlized Doily. Adhere the doily to the center of the velvet ribbon using Dimensionals.
- Using the Basic Black marker, color in just the word “love” on the “love what you do” image. Stamp the word on the Rich Razzleberry 5/8” x 1 ½” piece of cardstock. Create banner tips on both sides using your scissors. Adhere the banner to the lower right side of the doily using Dimensionals.
- Add Clear Wink of Stella to the flowers.


Don’t forget to check out my Project PDF Tutorial Library for more project tutorials that feature complete card collections and fancy folds. Click HERE to view the library. All the supplies can be purchased in my online store. I provide generous ordering REWARDS, too! Details on my REWARDS program can be found HERE.

When you spend $25 in product* (*before tax and shipping) in my online store you’ll receive an invitation to join my “Live with Lisa” event – Live demonstrations, a bundle of free tutorials and product Prize Patrol. Spend $50* and you’ll receive all that PLUS a free product gift. Check out my REWARDS program by clicking the image below. Be sure to use this month’s host code found above the “shop now” button here on my blog.

Look What’s Stealing the Show
If the new catalog debuting on June 1st isn’t enough excitement, June’s Paper Pumpkin kit is another reason. The June Paper Pumpkin kit coordinates with an upcoming, new suite of catalog products! In addition, all my Paper Pumpkin subscribers receive added inspiration – my Paper Pumpkin Parade – a bundle of tutorials with additional project ideas using each month’s kit! Subscribe by June 10th for this show stopping kit!


so pretty
Thank you, Donna! Enjoy the tutorial.
Very pretty; TFS!
A beautiful card thank you Lisa, I have saved the PDF safely for future use. :O)