If you’re eager to get your hands on NEW catalog product the wait is over! The Share What You Love promotion begins today and will run through May 31st. You can purchase the NEW 2018-2020 In Color ink pads and/or one of three special Bundles during this special pre-release. These Bundles are exclusive to the early release and will no longer be available after May 31st. I’ve included a short video that will show you all the bundle options and the new 2018-2012 In Color ink pad offer. No minimum order is required.
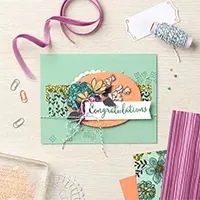
And a promotion isn’t any fun without a little inspiration so be sure to scroll down to see my card and the free tutorial using products that are part of this promotion! Remember, too, that my online ordering REWARDS apply. Place a $25 product order and receive an invitation to my Live with Lisa event which includes a bundle of free tutorials and entry into my product prize drawing. Place a $50 product order and receive all that plus your choice of free product gift. Details on my REWARDS program can be found HERE.
Click on the image below to view the images in a larger format.
This card was included in the Simon Says: Anything Goes Challenge
 All images 1990-2018© Stampin’ Up!®
Stampin’ Up! Supplies:
- STAMPS – Love What You Do Photopolymer (148042)
- PAPER – Pear Pizzazz (131201), Whisper White (100730), Share What You Love Specialty Designer Paper (146926), Gold Foil Sheets (132622)
- INK – Tuxedo Black Memento (132708), Pear Pizzazz (131180)
- OTHER – Pretty Label Punch (143715), Share What You Love Artisan Pearls (146927), Gold Metallic Thread (138401), Big Shot (143263), Lovely Floral Dynamic Textured Impressions Embossing Folder (148048), Stampin’ Dimensionals (104430)
Cutting & Scoring:
- Whisper White (base) – 5 ½” x 8 ½”, score at 4 ¼” and fold
- Whisper White – 4” x 5 ¼”
- Pear Pizzazz – 4 1/8” x 5 3/8”
- Pear Pizzazz – scrap
- Designer Paper – ½” x 4”
- Gold Foil – ¼” x 4”
Instructions:
- Emboss the floral image on the upper portion of the Whisper White cardstock layer using the Lovely Floral Embossing Folder.
- Adhere the designer paper strip to the Gold Foil, leaving 1/8” of an inch showing. Hold the strip over the cardstock over the white layer to gauge where the stems will need to be stamped. If necessary, place a small pencil mark in those areas. Remember to allow space for the greeting.
- Stamp the solid stem image using Pear Pizzazz ink, several times. I didn’t reink some of the stems to allow for variation in color.
- Adhere the designer paper/gold foil strip to the white layer, just below the embossed area. Adhere this layer to the Pear Pizzazz cardstock. Adhere these layers to the Whisper White card base.
- Stamp the greeting using Memento ink on Pear Pizzazz scrap cardstock. Punch out the greeting using the Pretty Label Punch.
- Add several Dimensionals to the backside of the greeting. Remove the paper backing. Wrap the Gold Metallic Thread around your hand several times. Slid the thread off your hand, cinching it in the center and adhere it diagonally across the Dimensionals to secure it in place. Adhere the greeting to the far-right side of the designer paper strip.
- Add two Artisan Pearls, one on each side of the greeting. Add one Artisan Pearl to the center of the large embossed flower.


I love your projects. I’m trying to do more than a hobbist. My upline is 3 1/2 hours away from me and doesn’t have meetings. I really appreciate learning from demonstators like you.
Thank you,
Vicki
Aww, thank you, Vicki. I appreciate the kind words. Happy Stamping!
I really enjoy your projects and well planned lay outs, thank you for sharing your wonderful ideas! Was wondering if you have demo prices for any of your classes that another demo could use for also?
Hi Jan! Thanks for your comment. I do not offer demo discounted prices for my online classes simply because the same amount of work goes into them. I can assure you the $1 per page for my PDF tutorials is well worth it. There are numerous pictures of each project along with detailed step-by-step instructions. My Studio Stamps in the Mail kits include free pre-cut supplies to make 8 cards which include envelopes and often miscellaneous accessories. I also provide a PDF tutorial for those projects as well as a video. I hope you understand my position.
I absolutely love to save your PDFs Lisa, they are always such lovely designs that I want to save them to make sure I can always go back to them whenever I want to. :O)