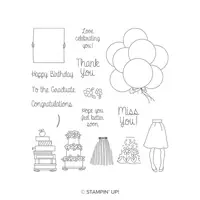
Often times during the designing process I’ll make multiples of a card. I’ll create the first one then tweak it and make a second and so on. I’ve been known to make a dozen of the same card with small variations – all in an effort to create the “one”. That’s exactly the what happened with the card I’m sharing today. My first thought was to create a vellum overlay to use the new host exclusive stamp set “Hand Delivered” to create a fancy fold birthday card. After I was finished I thought “simple might be better” and created a second one without the overlay. I’m still tossed up on which one I like the best so I’ll let you decide. Be sure to leave me a comment with your favorite.
Last Wednesday I held a Facebook Live event and demonstrated this card using markers. The samples show below are using the ink refills and an Aqua Painter. The best part of Stampin’ Up! products is the color coordination – choose your favorite coloring medium! I’ve edited the Facebook Live recording for time and content and have included it below along with pictures and a tutorial. I’ve included written instructions below for those of you using a mobile device. I also have a free PDF tutorial available for those that would like to download and save this project for a later day.
If you’re on Facebook I’d love to have you join me for future live events. Be sure to “like” and “follow” my Facebook page by clicking on the image below.
I’ve got lots more tutorials in my PDF Tutorial Library– click HERE. All the supplies used in my projects can be purchased in my online store. I provide generous ordering REWARDS, too – details HERE.
Click on the image below to view the video.
 All images © 1990-2018 Stampin’ Up!®
Supply List
- Hand Delivered Photopolymer Stamp Set – 146808
- Tuxedo Black Memento Ink Pad – 132708
- 2018-2020 In Color Stampin’ Write Markers – 147159
- Subtles Stampin’ Write Markers – 147156
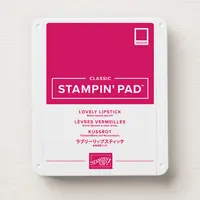
- Lovely Lipstick 8-1/2″ X 11″ Cardstock – 146970
- Whisper White 8-1/2″ X 11″ Cardstock – 100730
- Basic Black Solid Baker’s Twine – 141682
- Big Shot – 143263
- Polka Dot Basics Textured Impressions Embossing Folder – 143709
- Clear Wink of Stella Glitter Brush – 141897
Measurements
- Lovely Lipstick (base) – 5 ½” x 8 ½”, folded then cut 2 1/2” off
- Whisper White – cut 2 pieces @ 2 ½” x 4”
- Basic Black – 2 ¾” x 4 ¼”
- Baker’s Twine – 20”
Directions
- Stamp the greeting using Memento ink in the lower right corner of the card base.
- Using the embossing folder, emboss the back portion of the card base. I did not emboss the flap.
- Stamp the balloon image using Memento ink at the top of one of the white cardstock pieces. Be sure to allocate room for the body. Stamp the body image using Memento ink under the balloons. Stamp the skirt insert image using Memento ink inside the lower portion of her dress.
- Color in the image as the following markers:
- Balloons – Lovely Lipstick, Pool Party, Pineapple Punch
- Arms and legs – Powder Pink
- Lines in skirt – Pineapple Punch
- Adhere the white cardstock to the Basic Black layer. Adhere these layers to the short flap on the card front. Be certain to only place adhesive on the left side of the image.
- Adhere the second piece of white cardstock to the inside of the card, making sure that it is aligned to the outside panel. The inside cardstock should not be visible from the outside of when the card is closed.
- Wrap the baker’s twine around the card on the flap side as shown. Tie in a knot at the top then finish with a bow.
- Add Clear Wink of Stella to the balloons.


OPTIONAL VELLUM OVERLAY:
- Cut the vellum 2 1/2″ x 5″
- Stamp the image on the vellum using Jet Black StazOn ink (item #1010406). Let dry.
- Stamp and color in the balloons on the white cardstock.
- Stamp the body image using Memento ink on the vellum. Let dry.
- Stamp the greeting using Lovely Lipstick ink on white scrap cardstock. Cut out the cardstock to fit the vellum area as shown. Adhere the white cardstock to the vellum.
- Lay the vellum over the white cardstock image. Crease along the edges of the vellum and fold the excess to the backside. Adhere in place to secure.







This stamp set really caught my eye Lisa when I went through my new catalogue. I was just a little upset that it was a hostess set and not a set I could just purchase. Never mind will just have to spend enough to get it I suppose. What a an awful thing to have to do! LOL Love, love, love your fun fold card. :O) x
It’s well worth a sizable order, Lorraine – which is really easy to do with this brand new catalog because it’s loaded with amazing products!
I caught your Face Book project and though it and you did great ,I like the card
Without the vellum overlay, I’m ordering that stamp on my next order.
Thanks for chiming in with your favorites vote! It’s a great stamp set and you won’t be disappointed!
Hi Lisa, prefer the card without the vellum since I love the brightness of the balloons. Great design that I will definitely incorporate into my cardmaking! Thank you for sharing?
Thanks for letting me know your favorite, Kathy! I prefer it without the vellum as well and for the same reason you do. Thanks for stopping by to watch.
Hi Lisa, I like the one without the vellum best. They are both adorable. I just got this stamp set and can’t wait to play with it. Thanks for the inspiration.
Hi Ceresa! I favor the one without the vellum as well. Thanks for watching and stopping by to comment. I appreciate the feedback.