It’s summer and we’re all enjoying longer hours of daylight and warmer temperatures. If you’ve had enough of the heat, I’ve got a great way to cool off – stamping – indoors – with air conditioning! This tropical birthday card tutorial is not only easy but it uses one of my very favorite tools – the Stamparatus and will provide instructions on how to hinge stamp.
I’ve included written instructions below for today’s tropical birthday card tutorial along with an option for the free PDF tutorial download. Whether you choose to copy, print or save this tutorial, I’m certain the layout and/or the colors will inspire you.
And, speaking of tutorials – today is the final day of my customer appreciation gift. Details below!
Color Your Season Exclusive Begins August 1
The Blended Seasons stamp set is an exclusive 10-piece set with images for every season! The Stitched Season Framelits coordinate beautifully and include stitched frame dies. Purchase the stamps and the dies as a Bundle and save 10%. If you’re wondering how you’ll color these beautiful images, consider adding the 10 new colors of Watercolor Pencils (These pencils may be available in the future).
The entire Color Your Season Suite of products are only available August 1-31 or while supplies last, whichever comes first.

Tropical Birthday Card Tutorial
 All images © 1990-2018 Stampin’ Up!®
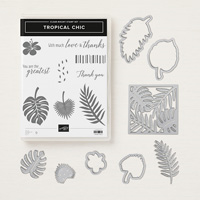
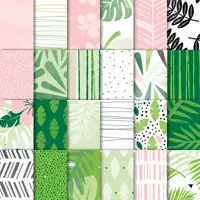
Supplies for Tropical Birthday card:
- Stamps – Topical Chic Bundle (148399); Beautiful Day (145915)
- Paper – Thick Whisper White (140272); Shaded Spruce (146981); Whisper White (100730); Tropical Escape Designer Series Paper (146916)
- Ink – Granny Apple Green (147095); Blushing Bride (147100)
- Other – Stamparatus (146276), Clear Rhinestones (144220); Simply Shammy (147042)
Measurements:
- Thick Whisper White (base): 4¼” x 11”, score at 5 ½” and fold
- Whisper White (layer): 3 ½” x 5 ½”
- Whisper White – scraps
- Shaded Spruce (strip): 1/8” x 5 ½”
- Designer Paper: 1” x 5 ½”
Instructions:
- Adhere the designer paper to the left side of the card base/
- Hinge stamp the greeting using the Stamparatus on the Whisper White layer. Place your cardstock in the right corner of the Stamparatus. Lay your greeting where you would like it and apply pressure to the clear plate to adhere the image. Ink the greeting using Granny Apple Green ink and stamp onto the cardstock. Clear the stamp using the Shammy. Move the clear plate down to the next hinge and repeat using Blushing Bride ink. Clean the stamp using the Shammy and repeat this process several more times until you’ve filled the layer as shown. Adhere the layer to the card base, adhering it slightly over the designer paper.
- Adhere the Shaded Spruce strip between the white layer and the designer paper.
- Stamp the 2 leaves using Granny Apple Green ink on Whisper White scrap cardstock. Die cut the leaves using their coordinating Thinlits.
- Stamp 2 of the ferns using Shaded Spruce ink on Whisper White scrap cardstock. Die cut the ferns using their coordinating Thinlit.
- Stamp the flower using Blushing Bride ink on Whisper White scrap cardstock. Die cut the flower using the coordinating Thinlit.
- Adhere the ferns, leaves and flower to the lower right side of the Whisper White layer using a combination of Glue Dots and Dimensionals as designed.
- Add a clear rhinestone to the center of the flower.
Customer Appreciation Gift

- Place an order through my online store HERE between July 20, 2018 through July 27, 2018
- Visit my tutorial library HERE and choose a tutorial you would like. There are 40+ to choose from!
- Once you receive your online order confirmation from Stampin’ Up!, email me HERE and tell me which tutorial you would like.
Did You Get Your Free Ink Pads?
The free 10-pack of color family ink pad special is ending in just a few days. You’ve got until July 31st to create your own custom starter kit and include your ink pads! Select $125 in Stampin’ Up! products and pay a reduced price of just $99. The entire kit ships to your door for FREE! But the savings doesn’t stop there. You’ll enjoy a 20% discount on any and all future orders through January 31, 2019. There is absolutely NO OBLIGATION so why pass up such a great offer? Get all the details by clicking on the image below.

Here are the supplies I used to create my card. Click on any of the images to be redirected to my online store. I offer exclusive and generous online ordering REWARDS, too!