I’m honored to have been asked to join the Santa’s Little Elves Design Team! This group of busy little elves have been working hard to bring you some AMAZING projects every Friday from November 3rd through December 15th. Every Friday I will be posting a project and tutorial for you to enjoy. Step-by-step instructions, color photos and a complete list of supplies will be included. This design team is all about bringing you fabulous gift ideas that you can create for family, friends, co-workers, neighbors and teachers without having to brainstorm the creation all on your own.

I’ve included written instructions below for those of you using a mobile device. I also have a free PDF tutorial available for those that would like to download and save this project for a later day.
Don’t forget to check out my Project PDF Tutorial Library for more project tutorials that feature complete card collections and fancy folds. Click HERE to view the library. All the supplies can be purchased in my online store. I provide generous ordering REWARDS, too! Details on my REWARDS program can be found HERE.

Framed with Joy
Stampin’ Up! Supplies:
- PAPER – Merry Little Christmas Designer Series Paper (144621), Basic Black (121045), Silver Foil Sheets (132178)
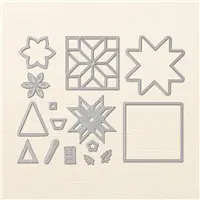
- OTHER – Big Shot (143263), Large Letter Framelits (141712), Quilt Builder Framelit Dies (144673), Clear Faceted Gems (144142), Stampin’ Dimensionals (104430), Mini Stampin’ Dimensionals (144108), Frame 4 ½” x 6 ½”, Snail Adhesive (104332), Multipurpose Liquid Glue (110755)
Cutting & Scoring:
- Basic Black – 3 ¼” x 3 ¼”, 2 7/8” x 2 7/8” & scraps
- Silver Foil Sheets – 3” x 3” & scraps
- Merry Little Christmas Designer Series Paper – 5” x 7” & scraps
Instructions:
- Die cut various patterns of Merry Little Christmas Designer Series Paper in the large detailed square – sorting them into stacks.
- Die cut large detailed square on 3” x 3” Silver Foil layer.
- Add Snail Adhesive to entire front layer of 2 7/8” x 2 7/8” Basic Black layer.
- Add the Silver Foil die cut to this layer and then alternate different patterns of Merry Christmas Designer Series Paper as shown in photo above – like putting a puzzle together.
- Adhere quilted layer to 3 ¼” x 3 ¼” Basic Black Layer with Multipurpose Liquid Glue and then to 5” x 7” Merry Christmas Designer Series Paper background layer with Stampin’ Dimensionals where shown.
- Die cut Large Letters JOY with Basic Black & Silver Foil scraps.
- Adhere Silver Foil letters over top of Basic Black letters off setting them a little bit with Multipurpose Liquid Glue – add Mini Stampin’ Dimensionals to the back of letters
- Using Basic Black scraps die cut flower outline and die cut detailed flower with the inside petal image – you’ll have two flowers.
- Adhere detailed outline of flower to solid flower with Multipurpose Liquid Glue.
- Die cut the detailed flower on Silver Foil Sheet scrap and glue Silver Foil petals back into petal slots on Basic Black flower.
- Put letters into place and flower using Stampin’ Dimensionals.
- Add a Clear Faceted Gem to the flower center and the quilt center.
- Place panel in frame.


Spotlight with Lisa Recap
If you missed last night’s Facebook Live event I’ve included the video recording, pictures and cutting dimensions below.
Cutting Dimensions:
Night of Navy base is cut 5 1/2″ x 8 1/2″
Night of Navy layer is cut 3″ x 4 1/4″
Whisper White layer is cut 3 1/8″ x 4 3/8″
Whisper White banner is cut 1 1/4″ x 3 1/2″


3 Days Left to Order!
The ordering period for this month’s Studio Stamps in the Mail ends on Sunday, November 19th. This month’s edition includes the Snowflake Sentiments stamp set, Foil Snowflakes, the Winter Wonder Embossing Folder and pre-cut supplies to make 8 cards. There are 2 cards of each of 4 different designs and one is a fancy fold! All orders include accessories, envelopes, a video and PDF tutorial, making it easy for you to stamp along with me from home. Click on the image below to see the products and the cards included.
If you already own the stamp set and/or the products, you can make substitutions and still receive the pre-cut supplies. Click HERE To let me know. Want just the PDF tutorial? I’ve got that available, too. Click HERE.