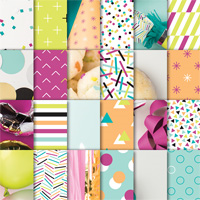
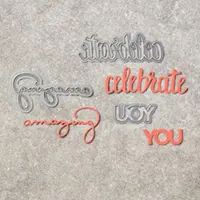
I’ve got something different for you today – a 12″x12″ scrapbook layout. This page uses the Picture Perfect Birthday stamp set and the coordinating Picture Perfect Party Designer Paper Stack. The Celebrate You Thinlits were part of the free Sale-A-Bration $100 level offerings but they are coming back! They will be available in the new annual catalog debuting on June 1st.
SPOILER ALERT! This stamp set will be featured in my April Studio Stamps in the Mail which begins on April 11th. Be sure to click HERE to see the pre-ordering details and see sneak peek pictures of the completed cards.
I’ve included written instructions below for those of you using a mobile device. I also have a free PDF tutorial available for those that would like to download and save this project for a later day.
Don’t forget to check out my Project PDF Tutorial Library for more project tutorials that feature complete card collections and fancy folds. Click HERE to view the library. All the supplies can be purchased in my online store. I provide generous ordering REWARDS, too! Details on my REWARDS program can be found HERE.
 All images © 1990-2018 Stampin’ Up!®
Supplies:
- Stamps – Picture Perfect Birthday (145519)
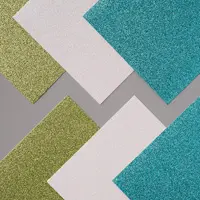
- Paper – White 12 x 12 (124302); Whisper White (100730); Basic Black (121045); Berry Burst (144243); Peekaboo Peach (141417); Pool Party (122924); Lemon Lime Twist (144245); Picture Perfect Party 6×6 Designer Series Paper (145559); Myths & Magic Glimmer Paper (145601)
- Ink – Pool Party (126982); Bermuda Bay (131171); Berry Burst (144083); Peekaboo Peach (141398); Lemon Lime Twist (144086); Tuxedo Black Memento Ink (132708)
- Other – Balloon Bouquet Punch (140609); Big Shot Die Cutting Machine (143263); Celebrate You Thinlits Dies (146840); Multipurpose Adhesive Sheets (144106); Whisper White Solid Bakers Twine (124262); Dimensionals (104430)
Measurements:
- Whisper White: 4 1/8” x 4 1/8”
- Whisper White: scraps
- Basic Black: 4 3/8” x 4 3/8”
- Basic Black: (2 pieces) 2” x 4”
- Berry Burst: 1” x 2”
- Lemon Lime Twist: scrap
- Peekaboo Peach: scrap
- Pool Party: scrap
- Iridescent Glimmer Paper: scrap
- Adhesive Sheets: (2 pieces) 1 ¾” x 3 ¾”
- Adhesive Sheets: ¾” x 1 ¾”
- Designer Paper (various patterns of choice): 5” x 5”
- Baker’s Twine: (4 pieces) 6”
Instructions:
- Add the 5” x 5” pieces of patterned paper pieces to a 12”x12” piece of Whisper White cardstock as shown. You will have a 7/8” border all the way around and a 1/8” border in-between each of the pieces.
- Adhere the 4 1/8” square of Whisper White cardstock to the center of the white cardstock to Basic Black cardstock. Adhere these layers to the center of the layout using Dimensionals.
- Adhere the 1 ¾” x 3 ¾” pieces of adhesive sheets to the back of both the 2” x 4” pieces of Basic Black cardstock. Die cut the word “celebrate” using one of these pieces. Die cut the word “amazing” using the remaining piece. Remove the paper backing to the die cut words and adhere them as shown.
- Adhere the ¾” x 1 ¾” piece of adhesive sheet to the Berry Burst cardstock. Die cut the word “you” from this piece. Remove the paper backing from the die cut word and adhere it as shown.
- Punch a small balloon using Pool Party scrap cardstock. Punch two large balloons, one from Peekaboo Peach scrap cardstock and the other from the iridescent glimmer paper.
- Using Dimensionals, adhere the baker’s twine to the backside of the 3 balloons. Adhere the balloons to the layout as shown. Wrap the 4th piece of baker’s twine around the strings of the balloons, cinch them together and make a bow. Use a Glue Dot to adhere them, placing it behind the knot of the bow where it will be hidden.
- Stamp the entire greeting “today we celebrate…” three separate times as indicated below. Cut the words out using your scissors. Adhere them to the layout as shown.
- “today we” – Memento ink on Lemon Lime Twist scrap cardstock
- “wonderful” – Bermuda Bay ink on Whisper White scrap cardstock
- “brilliant” – Berry Burst ink on Whisper White scrap cardstock
Stamp the stem of the party blower using Pool Party ink on white scrap cardstock. Stamp the stripes on the stem using Bermuda Bay ink. Stamp the fringe using Berry Burst ink. Stamp the blower using Lemon Lime Twist ink. Cut out the image using your scissors. Adhere to the layout as shown using Dimensionals.

Going, Going, Gone!

On April 9, at 1:00 PM (MT), Stampin’ Up! will post the retiring lists for the 2018 Occasions and 2017-2018 Annual catalogs. These last-chance products will only be available through May 31 or while supplies last—so check my website on April 9th and make your “must have” list!
NOW is the time to stock up on retiring 2016-2018 In Colors. Don’t wait until April 9th because these colors will sell out quickly! Remember to order ink refills for your ink pads, cardstock and any coordinating accessories (ribbons, designer papers, etc.) that you might want.
All on my online ordering REWARDS apply!
Project PDF Tutorial Library
If you’re looking for fresh ideas then take a peek at my Project PDF Tutorial Library. There are over 45 different tutorials available for a nominal fee. Tutorials include card collections, 3D projects and fancy folds. When you purchase my Project PDF Tutorials they will contain
- Clear, color photos from various angles will make it easy for you to mimic the construction of the card.
- Step by step instructions with cutting dimensions and tips.
- A complete supply list including item codes and product descriptions. All the products used can be purchased in my online store.
- Prices are reminiscent to the number of pages included.
Here are just a few of the recent additions. Click HERE or on a picture below to take a peek at the complete library!
Narrow Note Cards & Gift Box

Petal Palette Card Collection


An unusual project for us crafters to save this week Lisa, but thank you all the same because I am sure that at some point I will want to do some scrapbooking. Scrapbooking is not something I have done before, but never say never! So having this PDF may proved very useful. :O)